This third part will discuss firmware and slicer configuration, real experiments, and prints.
Make sure you read the first part which explores the components involved in both speed and acceleration performance and then the second part which explores all the theory behind the speed limiting factors.
Firmware
The first step in printing fast is to make sure our firmware can handle our required speed. We’ll take a look mostly about maximum axis speed. This example will be based on Repetier firmware, but the equivalent configuration should be very similar between firmware.
Step Frequency
300mm/s is very fast and we need to make sure our microcontroller can handle this speed. Let’s consider we have the following configuration:
- 1.8° Stepper motor (200 full steps per rotation)
- Stepper drivers configured at 16 µsteps
- 80 steps per mm ( very common GT2 20 teeth pulley )
We can check the stepper driver input pulse frequency based on our setup:
![]()
24 000 is quite a lot of steps per second. The theoretical limit for 8 bit based microcontrollers is around 40 000. However, at this speed, there is no more room for computation. The clever firmware programmer uses tricks such as the:
#define STEP_DOUBLER_FREQUENCY 10000
Or
#define ALLOW_QUADSTEPPING 1
Starting from 10 000 steps per second, the program will double the steps, and reduce its computation by half. The same logic applies to quad stepping. At 300mm/s, we are in quad stepping. Make sure it is enabled, or your microcontroller will have a bad time moving your printer at 300 mm/s.
Firmware modifications
Check the maximum speed and acceleration values. They must all be equal or above the ones we’ve found in part 2.
#define MAX_FEEDRATE_X 300
#define MAX_FEEDRATE_Y 300
#define EXT0_MAX_FEEDRATE 30
#define MAX_ACCELERATION_UNITS_PER_SQ_SECOND_X 3000
#define MAX_ACCELERATION_UNITS_PER_SQ_SECOND_Y 3000
#define MAX_TRAVEL_ACCELERATION_UNITS_PER_SQ_SECOND_X 3000
#define MAX_TRAVEL_ACCELERATION_UNITS_PER_SQ_SECOND_Y 3000
Slicer
The slicer has two option which should be checked:
- Maximum axis speed
- Maximum flow
This example will use Repetier Host with Cura. Again, the same option should be easy to find with a different hos, controller, and slicer.
In Config / Printer Setting / Extruder, make sure the “Max. Volume per second” is at 15 mm^3/s or higher.

in Slicer / Configuration / Print / Speed and Quality, make sure all the “Fast” values are at 300 mm/s, except for “First Layer“.
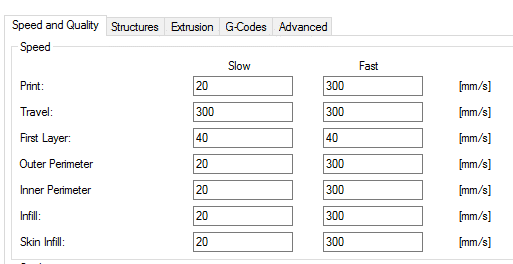
in Slicer / Configuration / Filament , make sure the “Minimum Layer Time” values is 0.
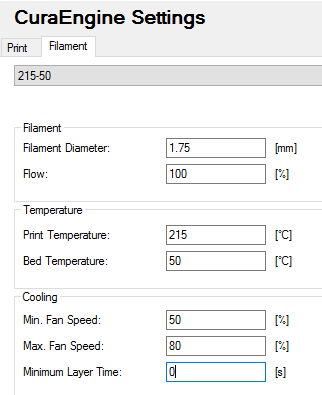
Test
Before printing an actual part at 300 mm/s, we will need to validate that our printer can handle all the parameters.
X & Y Speed Test
The first test will consist in validating the speed of our printer. It will be done using a simple G-code program where we increase axis movement speed up to 300 mm/s. The goal is to validate that the printer isn’t blocked by any configuration in the firmware.
Copy and paste this test in a Gcode file and run it! Your printer will move back and forth 100mm, from 100 mm/s up to 300 mm/s by steps of 50 mm/s each time. Each back and forth is repeated 5 times. You need to hear a difference
G28 ; Home all axis
G90 ; Absolute positioning
G1 F60 Z5 ; Raise Z
G0 F3000 X0 Y0 ; Go to printer home
; Benchmark at 100 mm/s
; X Axis
G0 F6000 X100
G0 X0
G0 X100
G0 X0
G0 X100
G0 X0
G0 X100
G0 X0
G0 X100
G0 X0
; Y Axis
G0 Y100
G0 Y0
G0 Y100
G0 Y0
G0 Y100
G0 Y0
G0 Y100
G0 Y0
G0 Y100
G0 Y0
; Benchmark at 150 mm/s
; X Axis
G0 F9000 X100
G0 X0
G0 X100
G0 X0
G0 X100
G0 X0
G0 X100
G0 X0
G0 X100
G0 X0
; Y Axis
G0 Y100
G0 Y0
G0 Y100
G0 Y0
G0 Y100
G0 Y0
G0 Y100
G0 Y0
G0 Y100
G0 Y0
; Benchmark at 200 mm/s
; X Axis
G0 F12000 X100
G0 X0
G0 X100
G0 X0
G0 X100
G0 X0
G0 X100
G0 X0
G0 X100
G0 X0
; Y Axis
G0 Y100
G0 Y0
G0 Y100
G0 Y0
G0 Y100
G0 Y0
G0 Y100
G0 Y0
G0 Y100
G0 Y0
; Benchmark at 250 mm/s
; X Axis
G0 F15000 X100
G0 X0
G0 X100
G0 X0
G0 X100
G0 X0
G0 X100
G0 X0
G0 X100
G0 X0
; Y Axis
G0 Y100
G0 Y0
G0 Y100
G0 Y0
G0 Y100
G0 Y0
G0 Y100
G0 Y0
G0 Y100
G0 Y0
; Benchmark at 300 mm/s
; X Axis
G0 F18000 X100
G0 X0
G0 X100
G0 X0
G0 X100
G0 X0
G0 X100
G0 X0
G0 X100
G0 X0
; Y Axis
G0 Y100
G0 Y0
G0 Y100
G0 Y0
G0 Y100
G0 Y0
G0 Y100
G0 Y0
G0 Y100
G0 Y0
Extrusion Test
This test will benchmark your hotend and extruder to make sure it can handle the required plastic flow. Three things can happen during this test:
- Everything is fine and the amount of flow is close enough to the expected command
- The extruder motor skips steps due to the force required to push the filament
- The actual flow is too much below the expected flow because the extruder is slipping, but not skipping. Slipping is due to poor driving design or poor spring adjustment.
Mark your filament 100mm above your extruder and check where your mark is once the test is completed.
Having more than 5mm ( < 95% efficiency) is considered problematic. Either:
- Increase temperature
- Increase the flow
- Please note that you might have reached your hotend and extruder limit if increasing the flow doesn’t improve anything.
G90 ; Absolute positioning
M104 S210
G28 Z; Home Z axis
G0 F240 Z50 ; Raise Z
G28 X Y; Home X and Y axis
G0 F3000 X0 Y0 ; Go to printer home
M109 S210
G92 E0
; Extruder Benchmark at 15 mm^3/s
G1 F374 E100
G0 F3000 X5
Print Test
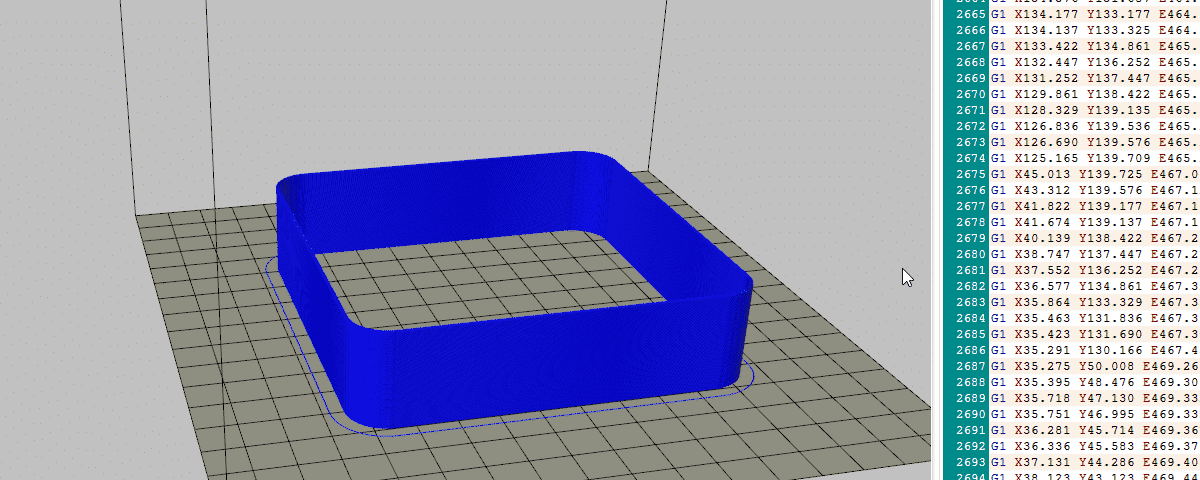
Our print will be very basic so we can easily see if something is wrong. Once this test works well, a complicated part will require fine-tuning in terms of cooling and acceleration values. As most parts have complex geometries, it is likely that the maximum speed of 300 mm/s isn’t constantly reached.
Any calibration cube can do the trick for this first print. You might need to scale it. Make sure:
- Layer height is 0.10mm.
- Speed is 300 mm/s.
- Part is at least 30mm long, or your printer won’t accelerate to 300 mm/s.
- Feeds inside your Gcode are F18000, not lower. If it is, you have a wromg configuration on your slicer or host.
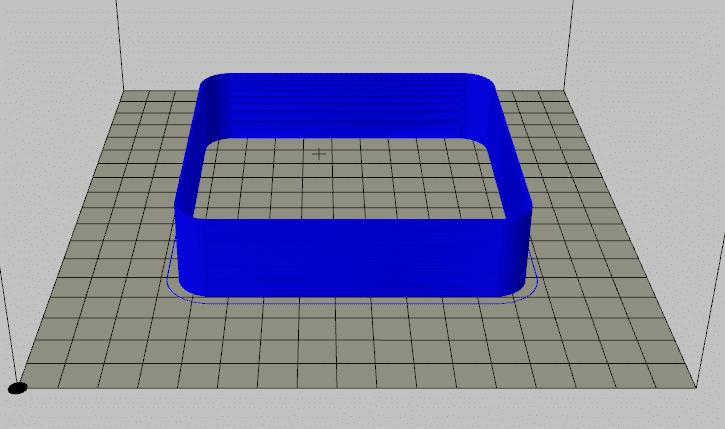
The video below shows our first print test. It is quite impressive to see a printer running at 300 mm/s!
Conclusion
We’ve seen how to configure our firmware and slicer, made some real experiments, and a first print. We are now able to print at 300 mm/s, which is quite impressive. However, the result shows a complete different texture from traditional 3D printing results.
Next blog part will cover more tests and analysis of the result. There will be a bit of discussion about the behavior and the rheology of plastics at high shear rate, which is what we are seeing at this speed.



10 Comments
I’ve been experimenting with high-speed printing, and I’ve been having a lot of trouble related to the “behavior and the rheology of plastics at high shear rate”. Were you still planning on doing a post about this? I’d be really, really interested. I’d like to find ways around the problem, if only I fully understood what that problem is 🙂
These guides are really, really good btw. Very helpful, detailed, and full of the technical stuff others don’t seem to cover. Thanks a lot.
Thanks Austin, I’m really glad you liked this blog!
I’ll definitely add this subject to my list. I already have a few interesting topics in this subject, it could make a very interesting blog!
Love the blog very well explained, even managed some of the more technical math.
Im looking to build a fast printer but want duel nozzles of different sizes, one for detail the other for infill and possibly straight sections. (need an appropriate ooze control for the large bore nozzle, have a couple of ideas)
Thanks for your comment!
At the higher shear rate you will see a greater temperature difference from the extruded material, the temperature gradient decreasing going in to the center of the melt causing viscosity variations. Do the four plastic variables effect this process? How much plastic pressure can develop in the nozzle? I am an Injection molder and back in the day before they had reciprocating screws they would put in a torpedo in the plunger to get more shearing action from the material. Setting of parameters as explained here is key. There are 11 parameter settings of the injection side of molding. I am stepping into the AM process. Let the Journey begin.
You’ll see that it might be a bit easier to work with AM compared to injection molding. Filament extrusion has made it very precise and easy ton control.
I am currently working on a Large volume 3d printer 1000mm x 1000mm x 300mm, that already has been able to print in low quality at 1000mm/sec. The Custom Hot end of 240 watts, is feeded by two spool of 3mm filament at the same time. The frame is made of welded steel, that has to be screwed to a concrete floor. running on Gear and pinion, on v rails with 4 Real V Bearing RM2-2RS 3/8″ per axis. The Stepper are not your usual nema 17, but nema 23 High Tork 4.2 amp per coil, with custom encoder for feedback. If you put your hand in the print area while it is working, it will definitely crush many bones !!! Actually, the mechanic in this build, is powerful enough for a metal CNC. That is what happens when you put together all the elements needed. A Crazy Engineer/programmer that was passed by the slow and limited build volume printer available on the market, COVID-19 Fuck up year, and a lot of cash to spend… We had to create our own cooling system for the build, because the previous layer never had the chance to harden enough to receive the incoming one ! I Know another guy, here in Quebec, that has done a different, but almost as fast as my elephant, with servo driven on 2 axis, using the core XY method, with linear bearing, 800mm/sec… We will probably work together for developing all the tricks needed for all materials. Nobody will steal my 3d Printer, 1st, as i said it is bolted to the floor, if not it will start printing in my garage end finish the job downtown, and secondly, it weights more that 300 pounds… Even with those crazy speed, we can accurately get to the 1/1000 of inch. Stepper driver are modified DM542T running at 48Vdc, that can change their stepping settings on the fly. from 400 to 25000. The sound produce by this monster is non sense, even my 2nd neighbor that lives at 400 feets away from my garage, knows when i start a print. We are adding support for smaller filament and higher resolution for normal smaller job. Everything is possible.. where there is a will, there is a way. The next addon will be 2 more axis on the head for real 3d printing, not just layers over layers, so we can print the infill fast, and finish the outside at slower speed for perfect result. (with other hotend and extruder, i have room for them ! 5, 8 10 12, what is the difference!!! Unless Covid kill us all, it should all work eventually… It will be on my Youtube channel very soon for the interested enthusiasts !
What is your YouTube channel? I have to see this!
Hi!
Here is our channel: https://www.youtube.com/channel/UC7KHvr3UyGcD4TRw6Orv_HQ/videos
However, I believe the videos of printing at 300mm/s were the ones you see in the blog, we don’t have more of them.
Hey,,, did you ever finish this build?? Very fascinated by this..