Understanding Flow-to-RPM Factor in 3D Printing
This guide provides initial parameters for your pellet extruder to help optimize 3D printing, but fine-tuning is necessary for optimal results. Extrusion speeds may vary based on your needs and equipment capabilities; you might be able to print faster or slower than what’s suggested. Experimentation is encouraged to find the ideal settings for your prints. For example, changing the pellet brand can significantly impact the behavior.
Printing with Pellets vs. Printing with Filament
When using a filament extruder, precision in estimating the amount of polymer extruded is achievable. Variations in filament diameter and slip from the extruder’s gripping wheel are the primary factors impacting output accuracy. While slight discrepancies may occur due to these factors, overall, users can anticipate a relatively consistent extrusion volume.
Operating a pellet extruder presents a more complex challenge in determining the precise amount of polymer extruded. Instead of directly moving a set volume, the screw builds pressure to facilitate the flow of molten polymer. Numerous factors significantly influence the relationship between screw rotation and extrusion volume, including resin type, manufacturer, extrusion temperature, screw design, pellet shape, nozzle size, additives, fiber content, humidity content, and idling time. Understanding these factors is crucial to optimize 3D printing with pellet extruders.
Using RPM or E Length for 3D Printing Optimization?
Traditionally, 3D printers use a length measure for the E axis (Extruder). Most slicers will output a movement with an E value corresponding to the amount of polymer to be extruded. For robots, this value is sometimes preferred as RPM due to the way robots work with added axes.
For traditional 3D printers, our online documentation specifies a steps/mm value for the extruder. This value is calibrated for PLA and should be your reference. For using a different polymer, simply refer to the table column “Extrusion Length Flow Percentage.” When configuring a new “filament” in your slicer, use the Extrusion Length Flow Percentage as the flow multiplier for this new polymer, and the results should be very close.
Steps for Calculating the Screw Speed in Pellet Extruders
Before diving deeper into this guide on finding the screw RPM, it’s highly advised to take a few minutes to read our blog about printing speed. This will give you a solid understanding of the process in general.
Step 1: Find the Line Width and Line Thickness
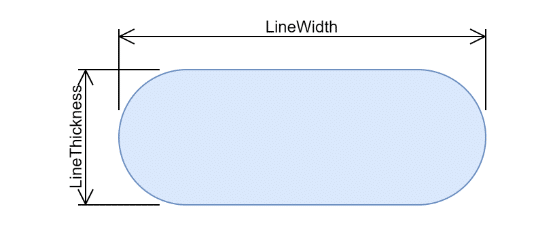
The first step is to determine the print parameters. It usually starts with the line thickness, where a higher value will take less time but give a rougher result, and a lower value will increase the printing time but give better resolution.
Use the rule of thumb given in our blog for determining the right line width based on the nozzle you are using and the layer thickness.
For this example, we will consider a nozzle of 3mm, a layer thickness of 1mm, and a line width of 4mm.
Step 2: Find the Linear Speed
Each polymer and each extruder has its limit. For the pellet extruder, we have a list of frequently used polymers with a rated maximum flow rate we have tested. Refer to these charts for this step as we want to ensure we’ll be within the extruder’s capabilities.
At this step, we’ll calculate the maximum extruder speed and then decide if we want to go slower. We recommend starting with a value of 75% of the maximum flow as the values we have obtained in the charts are the exact point where the motor reached its maximum torque. A small safety margin is recommended as a starting point.
Let’s consider a fictive polymer that has a maximum flow rate of 300mm³/s. We’ll determine the maximum printing speed using the formula below. The bead’s shape is considered as an oblong, and the formula has been simplified for ease of use, thus the « Pi » constant has disappeared for simplification and leads to the « 0.215 » value in the formula.
Using this polymer with this layer configuration, we can reach 59mm/s. Sometimes, this formula can lead to very high numbers, especially when you are using very thin layer thicknesses. Use your judgment and reduce the actual printing speed from the theoretical maximum based on your machine capabilities.
In this example, we will consider a speed of 55mm/s.
Step 3: Determine the Flow Rate
Now that we have ensured the linear speed generates an equal or lower flow rate than the recommended one, we can determine the final value using a very similar formula. The flow rate will be used with the Flow-RPM factor.
Step 4: Determine the Screw RPM
Referring to the table, find the « FRPM » value for your polymer and multiply it by the flow rate to get the motor RPM.
Step 5: Validate the Line Width
As explained in our blog « The Ultimate Guide to 3D Printer Extruder, » the extruder should be calibrated to get the right RPM or flow percentage. The logic is the same as with a filament:
- Measure the wall thickness using a precise measuring tool.
- Compare the measured dimension with the theoretical one.
- Calculate the new RPM or flow percentage using a simple cross-multiplication.
General Information for 3D Printing Optimization
Printing isn’t always about speed. You might need to slow down the print in some areas if the part is too small and doesn’t have time to cool down properly. Adding more part cooling can help you print faster in these situations. In a printing context, the extrusion flow rate is not constant. Travels without material extrusion between two printed points, z-hop, wipe, machine acceleration, and speed limitations all affect the printing time. The extruder flow rate and the overall print flow rate are not the same. If you calculate the average flow rate considering the total print time, it does not reflect the maximum flow rate actually reached by the extruder during printing.
Fine-Tuning Your 3D Printing Process with Pellet Extruders
By understanding and implementing these steps, you can optimize your 3D printing process with pellet extruders. Ensure you refer to the manufacturer’s guidelines and experiment with different settings to achieve the best results. Optimize your 3D printing with pellet extruders and enjoy enhanced print precision.
Happy printing!

